
How to Run Starlink Off-Grid With Solar: The Complete RV Setup Guide (2026)
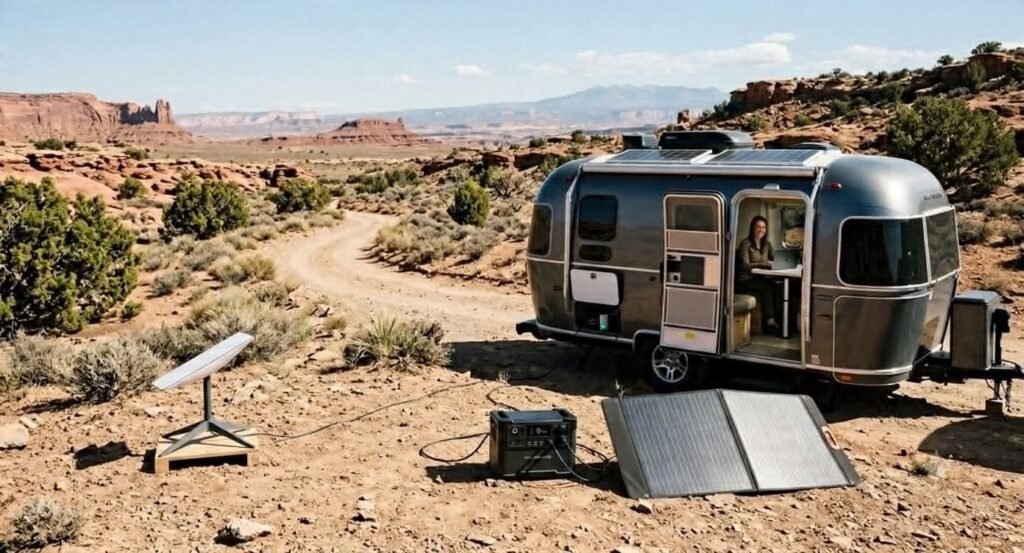
Imagine finding the perfect boondocking spot miles away from the nearest campground. The views are incredible, the campsite is peaceful, and your solar batteries are fully charged. Then you realize your internet connection is your lifeline for work, navigation, or staying in touch with family.
That’s where Starlink has changed RV travel.
The biggest question most RV owners ask isn’t whether Starlink works,it’s whether they can power it without carrying a noisy gas generator.
The good news is yes. With the right solar generator, battery capacity, and a little planning, you can stay connected almost anywhere.
In this guide, I’ll show you exactly how to build a reliable off-grid Starlink setup, calculate your power needs, choose the right equipment, and avoid the costly mistakes many RV owners make.
Can You Run Starlink Off-Grid Without a Generator?
Yes, you can absolutely run Starlink entirely off-grid without a noisy gas generator.
Modern satellite dishes are surprisingly efficient. Specifically, a standard Starlink RV dish consumes between 45 to 65 watts during normal streaming or working hours. This means a standard 10-hour remote workday requires roughly 500 to 650 watt-hours (Wh) of power.
Consequently, you can comfortably sustain this connection by using a high-quality portable solar generator. For continuous daily use alongside your laptop, we recommend a battery system with a baseline capacity of 600Wh to 1,000Wh paired with at least 200 watts of solar panels. This setup ensures you stay online 24/7, even during overcast days.
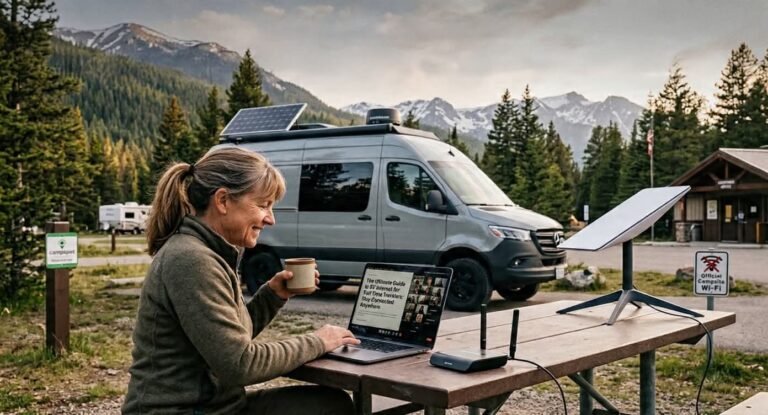
Why Starlink Is a Game Changer for RV Travelers
If you’ve spent any time traveling in an RV, you already know how frustrating it can be to find reliable internet. Whether you’re working remotely, streaming a movie, or simply checking tomorrow’s weather, a weak connection can quickly ruin your plans.
For years, RV travelers had to rely on campground Wi-Fi or cellular hotspots, both of which often failed in remote locations. Fortunately, Starlink has changed the way people stay connected on the road.
Instead of depending on nearby cell towers, Starlink uses a network of satellites to deliver fast, reliable internet almost anywhere with a clear view of the sky. That means more freedom, fewer compromises, and the confidence to explore places you may have avoided before.
Let’s take a closer look at why so many RV owners now consider Starlink one of their most valuable travel upgrades.
Bypassing Terrible Campground Wi-Fi
One of the biggest frustrations for RV travelers is unreliable campground Wi-Fi.We have all been there. You pull into a beautiful RV park, look at the resort brochure, and see “Free High-Speed Wi-Fi” listed at the top.
However, the moment the campground fills up in the evening, that connection slows down to a crawl. You can barely load an email, let alone join a Zoom call or stream a movie. Because Starlink bypasses local ground networks entirely and connects directly to overhead satellites, you get blazing-fast speeds no matter how crowded the campground gets.
Erasing Cellular Dead Zones
Many RVers rely on cellular hotspots from major networks. While hotspots are great near major highways, they quickly fail when you head into national parks or remote BLM land.
Consequently, traveling without a backup means risking total isolation. Starlink gives you a consistent footprint across the country, turning notorious cellular dead zones into fully functional remote offices.
True Remote Work Freedom
Managing a career from the road requires absolute reliability. If your internet drops mid-day, you miss deadlines and lose client trust.
Specifically, this system provides the high upload speeds and low latency needed for smooth video conferencing, cloud file sharing, and real-time collaboration. You no longer have to skip a beautiful destination just because you have a morning meeting.
Unlocking Premium Boondocking Locations
For many RV travelers, this freedom is the biggest reason to invest in Starlink.The best campsites are rarely found at packed RV resorts. Instead, they are hidden deep in the wilderness, miles away from utility lines.
Previously, boondocking for more than a couple of days meant completely disconnecting from the grid. Now, you can park your rig in the most remote deserts, forests, or mountain passes while maintaining a perfect digital connection.
Seamless HD Streaming and Entertainment
After a long day of driving or hiking, relaxing with a good movie is a great way to unwind. Unfortunately, traditional satellite dishes or weak data plans throttle your data or buffer constantly.
With an optimized setup, you can easily stream 4K movies, download heavy gaming updates, and connect multiple smartphones or tablets all at the same time without a single glitch.
Essential Peace of Mind and Safety
Safety should always be your top priority on the road. Knowing you can access weather alerts, navigation, or emergency assistance even in remote locations offers valuable peace of mind for every RV adventure.If your rig breaks down, if severe weather strikes, or if your pet needs urgent care, being stuck without a signal can turn a minor issue into a dangerous emergency.
Therefore, having a guaranteed connection to check weather radars, map out detour routes, or call for roadside assistance provides priceless security for you and your family.
Why Thousands of RV Travelers Are Switching to Starlink
✔ Work from almost anywhere
✔ Explore more remote destinations
✔ Stay connected with family and friends
💡 RV Explorer Journey Tip
Don’t ditch your cellular hotspot completely. While Starlink may become your primary internet connection, keeping an affordable cellular backup is still a smart idea. If heavy clouds, dense tree cover, or temporary obstructions affect your satellite signal, you can quickly switch to cellular data and stay connected.
One of the first questions RV owners ask is, “How much power does Starlink actually use?”
The answer depends on your Starlink model, the weather, and how you’re using the system. While Starlink is more energy-efficient than many people expect, understanding its power consumption is essential when planning an off-grid solar setup.
If you’re relying on a portable power station or solar generator, knowing your daily energy needs will help you choose the right battery size and avoid running out of power.
Startup vs. Normal Power Draw
Starlink doesn’t use the same amount of electricity all the time. During startup, the dish automatically searches for satellites and positions itself. This process briefly increases power consumption before settling into its normal operating range.
Here’s what you can typically expect:
| Operating Mode | Typical Power Usage |
|---|---|
| Startup | 75–100 watts |
| Normal browsing & streaming | 45–65 watts |
| Heavy downloads or uploads | 60–80 watts |
| Snow Melt Mode | Up to 100+ watts |
Note: Actual power consumption varies depending on your Starlink hardware, software updates, and environmental conditions.
For most RV travelers, normal operation falls between 45 and 65 watts, making Starlink a practical choice when paired with a properly sized solar generator and battery system.
Calculating Your Daily Power Consumption
Solar systems are sized using watt-hours (Wh) rather than watts. A watt measures how much electricity a device uses at a specific moment, while a watt-hour measures how much energy it consumes over time.
The basic formula is simple:
Watts × Hours = Watt-hours (Wh)
Let’s use an average power draw of 55 watts.
| Daily Usage | Estimated Energy Consumption |
|---|---|
| 8 hours | ~440 Wh |
| 10 hours | ~550 Wh |
| 24 hours | ~1,320 Wh |
What does this mean?
If you work remotely for about 8 to 10 hours each day, you’ll typically need 440–550 Wh just to power Starlink.
However, if you leave Starlink running 24 hours a day, your daily energy requirement increases to roughly 1,320 Wh. That’s a significant difference and an important factor when choosing your battery capacity.
💡 RV Explorer Journey Tip
Turn Starlink off when you don’t need it. If you’re hiking, sightseeing, or sleeping, powering the system down can save hundreds of watt-hours each day and significantly extend your battery life.
Why Snow Melt Mode Can Drain Your Battery
One of the most overlooked Starlink settings is Snow Melt Mode.
This feature automatically heats the dish when snow or ice is detected. It’s incredibly useful during winter camping but can dramatically increase power consumption.
For RV travelers who spend most of their time in warm or mild climates, leaving Snow Melt Mode enabled may waste valuable battery power.
When does Snow Melt Mode activate?
- Snow or ice accumulation
- Cold weather conditions
- Automatic detection by the Starlink system
How to disable Snow Melt Mode
Open the Starlink app and navigate to:
Settings → Snow Melt
If you don’t expect freezing temperatures, consider turning the feature off or switching it to manual mode.
When should you leave it on?
Keep Snow Melt Mode enabled if you’re traveling through snowy mountain regions or camping during winter. Maintaining a clear dish is more important than saving battery power in freezing conditions.
How Much Battery Capacity Do You Need?
Choosing the right battery is one of the most important decisions for your off-grid Starlink setup.
A battery that’s too small may leave you without internet before the day is over. On the other hand, buying a battery that’s much larger than you need can increase your costs unnecessarily.
The table below gives you a general idea of how long different battery sizes can power Starlink, assuming an average power draw of 55 watts and no solar charging during use.
| Battery Capacity | Approximate Starlink Runtime |
|---|---|
| 300 Wh | 5–6 hours |
| 500 Wh | 9 hours |
| 1,000 Wh | 18 hours |
| 1,500 Wh | 27 hours |
| 2,000 Wh | 36 hours |
Note: These estimates are for Starlink only. Charging laptops, phones, lights, refrigerators, or other appliances will reduce total runtime.
Which battery size is right for you?
Weekend RV Travelers
If you mostly camp on weekends and use Starlink for checking emails, browsing the web, and watching a movie, a compact power station around 500–700 Wh may be enough.
Remote Workers
If you work from your RV, attend video meetings, or spend long hours online, consider a battery with at least 1,000 Wh of usable capacity for a more comfortable safety margin.
Full-Time RVers and Boondockers
For travelers who live on the road or spend several days off-grid, a larger power station such as the ALLPOWERS S2000 Pro paired with solar panels offers much greater flexibility. With over 1,500 Wh of battery capacity, it can power Starlink alongside laptops, phones, lighting, and other essential devices while allowing solar panels to recharge the system throughout the day.
💡 RV Explorer Journey Recommendatios
Rather than choosing the biggest battery you can afford, calculate your daily energy needs first. Then select a solar generator that gives you enough capacity for your typical usage while leaving room for cloudy days and additional devices. A well-matched system is usually more efficient—and often more cost-effective—than simply buying the largest power station available.
Choosing the Best Solar Generator for Starlink
Once you know how much power Starlink uses, the next step is choosing a solar generator that can keep you connected throughout your trip.
Many RV owners focus on peak output, but that’s often the wrong approach. Peak output only tells you how much power a solar generator can deliver at one moment. For Starlink, battery capacity is far more important because it determines how long your internet will stay online before you need to recharge.
Think of it this way:
- Peak Output (Watts): How much power the unit can supply at one time.
- Battery Capacity (Wh): How much energy the unit stores.
Since Starlink typically uses around 45–65 watts during normal operation, a larger battery will usually provide more value than a higher peak output.
If you’re planning to work remotely, stream movies, or spend several days boondocking, choosing the right battery size can make the difference between a stress-free adventure and constantly worrying about your remaining power.
Best Budget Choice – ALLPOWERS R600
If you’re looking for an affordable and portable power station, the ALLPOWERS R600 is an excellent entry-level option.
Its compact size makes it easy to carry, while its battery capacity is suitable for shorter camping trips and weekend adventures. It’s also a great backup power source for Starlink, phones, tablets, cameras, and other small electronics.
Why We Like It
- Compact and lightweight
- Easy to transport
- Fast charging
- Pure sine wave inverter
- Great value for the price
Pros
- Budget-friendly
- Ideal for weekend camping
- Quiet operation
- Easy to use for beginners
Cons
- Limited runtime for extended off-grid trips
- Best suited for lighter power needs
- May require daily recharging if running multiple devices
Best For
- Weekend RV travelers
- Couples
- Occasional boondocking
- Emergency backup power
- Short remote work sessions
💡 RV Explorer Journey Recommendatios
If you camp a few weekends each month and primarily use Starlink for browsing, emails, video calls, and light streaming, the ALLPOWERS R600 offers an excellent balance of portability, performance, and affordability.
👉 Check the latest price and specifications for the ALLPOWERS R600.
Best Overall – ALLPOWERS S2000 Pro
For full-time RVers, digital nomads, and serious boondockers, the ALLPOWERS S2000 Pro is a much better long-term investment.
Its larger battery capacity allows you to power Starlink alongside laptops, phones, lighting, cameras, and other essential RV equipment without constantly monitoring your battery level.
When paired with quality solar panels, it creates a dependable off-grid power system that can support longer stays away from traditional campgrounds.
Why We Like It
- Large battery capacity
- Excellent solar charging performance
- Reliable for multiple devices
- Ideal for longer off-grid adventures
- Expandable for larger power needs
Pros
- Long runtime
- Powers several devices simultaneously
- Great for remote work
- Excellent solar compatibility
- Reliable off-grid performance
Cons
- Higher upfront investment
- Larger and heavier than portable models
Best For
- Full-time RV living
- Remote workers
- Digital nomads
- Extended boondocking
- Families traveling in larger RVs
💡 RV Explorer Journey Recommendatios
If reliable internet is essential for your work or lifestyle, investing in a larger power station like the ALLPOWERS S2000 Pro can provide greater peace of mind. The extra battery capacity gives you more flexibility, especially during cloudy weather or longer stays away from hookups.
👉 Explore the ALLPOWERS S2000 Pro and compare current pricing.
Solar Generator Comparison
Choosing the right solar generator depends on how you travel and how much power you use each day.
| Solar Generator | Battery Capacity | Estimated Starlink Runtime | Best For |
|---|---|---|---|
| ALLPOWERS R600 | 299 Wh | 5–6 hours | Weekend camping |
| ALLPOWERS S2000 Pro | 1,500+ Wh | 27+ hours | Full-time RV travel |
| Larger Expandable Systems | 2,000+ Wh | 36+ hours | Extended off-grid living |
Note: Estimated runtimes are based on Starlink using approximately 55 watts during normal operation. Actual results will vary depending on weather conditions, connected devices, and battery efficiency.
Choosing the Right Solar Panels
Your solar generator is only part of the equation. To stay off-grid longer, you also need enough solar panels to recharge your battery throughout the day.
The right panel depends on your travel style, available space, and how often you camp without electrical hookups.
Portable Solar Panels
Portable panels are lightweight, easy to transport, and can be positioned toward the sun throughout the day.
Best For
- Weekend campers
- Occasional boondocking
- Travelers who move frequently
Pros
- Easy to store
- Adjustable angle
- No permanent installation
Cons
- Must be set up every day
- Less convenient for long stays
Folding Solar Panels
Folding solar panels combine portability with higher output.
Many RV owners choose folding panels because they are easy to transport while still providing enough charging power for portable power stations.
Best For
- Portable solar generators
- Remote workers
- Flexible camping setups
Rigid Solar Panels
Rigid panels are permanently mounted on the roof of your RV.
They automatically charge your battery whenever sunlight is available, making them ideal for travelers who spend long periods on the road.
Best For
- Full-time RVers
- Long road trips
- Frequent boondocking
Roof-Mounted Solar Panels
Roof-mounted systems provide the greatest convenience because they’re always ready to generate electricity.
The trade-off is that your RV must be parked in direct sunlight for maximum efficiency.
If you prefer camping in the shade, portable panels may be a better choice because you can place them several feet away from your RV while keeping your batteries charging.
💡 RV Explorer Journey Tip
Many experienced RVers combine roof-mounted panels with one portable solar panel. This hybrid setup provides maximum flexibility when camping under trees or in partially shaded campsites.
How Many Solar Watts Do You Need?
The ideal solar array depends on your daily energy consumption.
Here are some general recommendations:
| Daily Energy Use | Recommended Solar Panels |
|---|---|
| Up to 500 Wh | 100–200W |
| Around 1,000 Wh | 200–300W |
| 1,500 Wh or more | 300–400W+ |
Remember that cloudy weather, shorter winter days, and shaded campsites will reduce charging performance.

Building the Perfect Off-Grid Starlink Setup
Creating a reliable off-grid internet system doesn’t have to be complicated. Every successful setup follows the same basic power flow.
☀️ Solar Panels
        │
        ▼
⚡ Charge Controller
        │
        ▼
🔋 Battery / Solar Generator
        │
        ▼
🔌 Power Output
        │
        ▼
🛰️ Starlink System
Step 1: Solar Panels
Solar panels capture sunlight and convert it into electricity. The more sunlight you collect, the faster you can recharge your battery during the day.
Step 2: Charge Controller
The charge controller regulates the electricity coming from your solar panels and protects your battery from overcharging. Most portable solar generators have this built in, while traditional RV solar systems use a separate controller.
Step 3: Battery or Solar Generator
The battery stores energy for use after sunset or during cloudy weather. Choosing the right battery capacity is the foundation of any reliable off-grid setup.
Step 4: Power Distribution
Your stored energy is then supplied to your devices through the solar generator’s AC outlets, DC outputs, or USB ports. This is where you’ll connect Starlink and any other equipment you need throughout the day.
Step 5: Starlink Internet
With adequate battery storage and enough solar charging, Starlink can provide fast, reliable internet almost anywhere with a clear view of the sky. Pairing it with a quality roof mount, such as those available from Winegard, can improve stability and help maintain a clear line of sight to the satellites, especially for RV travelers who move frequently.
💡 RV Explorer Journey Tip
The most successful off-grid RV setups aren’t necessarily the biggest or most expensive—they’re the ones where your daily solar input matches or exceeds your daily power consumption. Before buying equipment, calculate how much energy you use each day and build your system around those real numbers. That’s the best way to stay connected without carrying more battery capacity than you actually need.
Mounting Your Starlink Dish
Choosing the right place to mount your Starlink dish is just as important as choosing the right power system. Even the best internet plan won’t perform well if your dish cannot clearly see the sky.
Before setting up, always use the Starlink app to check for obstructions. A clear view of the sky helps you achieve the fastest speeds and the most reliable connection.
Roof Mount
A roof-mounted Starlink dish is the most convenient option for many RV owners. Once installed, it’s always ready to use, making setup quick and easy at every stop.
For a secure and professional installation, consider a quality mounting solution from Winegard. Their RV mounting products are designed to withstand travel vibrations and changing weather conditions.
Pros
- Fast setup at every campsite
- Secure while traveling
- Saves storage space
- Professional appearance
- Ideal for full-time RVers
Cons
- Difficult to reposition if trees block the signal
- Permanent installation required
- Less flexibility when camping in shaded areas
Ground Mount
A ground-mounted setup offers much more flexibility.
Instead of moving your entire RV, you can simply place the dish in an open area with a clear view of the sky.
Pros
- Easy to avoid trees
- Better satellite visibility
- Flexible placement
- Great for shaded campsites
Cons
- Takes longer to set up
- Requires additional storage space
- Dish must be secured during windy conditions
Parking in the Shade Without Blocking Starlink
Many RV travelers face the same challenge.
They want to park under trees to keep the RV cool while giving Starlink a clear view of the sky.
Fortunately, you can often enjoy both.
Park your RV in the shade and position the Starlink dish several feet away in a sunny, open location. This simple adjustment keeps your RV cooler while maintaining a strong satellite connection.
💡 RV Explorer Journey Tip
Always check for obstructions before leveling your RV. Spending two minutes with the Starlink app can save hours of frustration later.
DC vs. AC Power – Stop Wasting Battery Energy
Every off-grid RV owner wants to get the most from their battery. One of the easiest ways to improve efficiency is understanding the difference between DC and AC power.
Most RV batteries store 12V DC (Direct Current) power. However, many devices—including Starlink—are commonly powered through an AC outlet.
That means the electricity is converted more than once before reaching your equipment.
Typical Power Flow
🔋 Battery (12V DC)
        ↓
⚡ Inverter
        ↓
🔌 120V AC Outlet
        ↓
🛰️ Starlink Power Supply
        ↓
Starlink Router
Each conversion creates a small amount of energy loss, often called the “inverter tax.”
Most inverters lose around 10–15% of your available battery power during the conversion process.
Why a Direct DC Setup Is More Efficient
Whenever possible, reducing unnecessary power conversions helps extend battery life.
A properly designed DC-powered setup can:
- Improve overall efficiency
- Reduce battery drain
- Increase off-grid runtime
- Produce less heat
💡 RV Explorer Journey Tip
If you spend weeks boondocking each year, consider upgrading to a direct 12V Starlink power solution. Even small efficiency gains add up over time.
5 Common Mistakes to Avoid When Powering Starlink with Solar
Building an off-grid internet system isn’t difficult. However, a few common mistakes can lead to poor performance and unnecessary frustration.
Here’s how to avoid them.
Mistake #1 – Buying a Battery That’s Too Small
Many first-time RV owners underestimate their daily power needs.
Remember that Starlink is rarely the only device you’ll power. Laptops, lights, phones, and refrigerators all use energy too.
Always calculate your total daily consumption before buying a battery.
Mistake #2 – Ignoring Cloudy Weather
Solar panels perform best in direct sunlight.
Clouds, rain, and shorter winter days reduce charging efficiency.
For this reason, choose a battery that provides enough reserve power for days with limited sunshine.
Mistake #3 – Leaving Starlink Running Overnight
If you don’t need internet while sleeping, turn Starlink off.
Doing so can save hundreds of watt-hours every night and significantly extend your battery life.
Mistake #4 – Underestimating Panel Shading
Even a small shadow across one section of a solar panel can dramatically reduce its output.
Whenever possible, place portable panels in full sunlight throughout the day.
Mistake #5 – Buying Cheap Cables
Low-quality extension cables can create voltage drops and reduce system efficiency.
Choose quality cables that match your equipment and keep cable runs as short as practical.
Our Recommended Starlink Off-Grid Setup
If we were building a dependable off-grid Starlink system today, this is the setup we’d recommend for most RV travelers.
☀️ Solar Panels
        ↓
🔋 ALLPOWERS Solar Generator
        ↓
🛰️ Winegard Starlink Mount
        ↓
🔌 Starlink System
        ↓
📊 Battery Monitor
Recommended Equipment
✅ ALLPOWERS Solar Generator
Reliable battery storage with fast solar charging.
✅ Portable or Roof-Mounted Solar Panels
Choose portable panels for flexibility or roof-mounted panels for convenience.
✅ Winegard Mount
Provides a secure and durable mounting solution for your Starlink dish.
✅ Battery Monitor
Monitor your battery level in real time and avoid unexpected power loss.
Why We Recommend This Setup
This combination offers an excellent balance of portability, efficiency, and reliability. Whether you’re working remotely or enjoying a weekend getaway, it provides the power needed to stay connected almost anywhere.
Estimated Cost Breakdown
Your total investment depends on the equipment you choose. The table below provides a general estimate for a complete off-grid Starlink setup.
| Item | Estimated Cost |
|---|---|
| Starlink Hardware | $349–$599 |
| ALLPOWERS R600 | Varies |
| ALLPOWERS S2000 Pro | Varies |
| Portable Solar Panels | $200–$600 |
| Winegard Mount | $100–$250 |
| Battery Monitor | $50–$150 |
| Cables & Accessories | $50–$200 |
Note: Prices change frequently. Check the latest pricing before making your purchase.
Frequently Asked Questions
How many watts does Starlink use?
Most Starlink systems use between 45 and 65 watts during normal operation. Startup and Snow Melt Mode can temporarily increase power consumption.
Can I power Starlink with a Jackery?
Yes. Any properly sized portable power station, including Jackery models, can power Starlink if it provides enough battery capacity and output.
Can I run Starlink directly from my RV battery?
Yes, with the correct equipment and wiring. A direct 12V setup is often more efficient than using an inverter.
How long will a 1,000Wh battery power Starlink?
A 1,000Wh battery can typically power Starlink for approximately 18 hours, depending on usage and other connected devices.
Can Starlink stay on all night?
Yes. However, turning it off while you sleep can save a significant amount of battery power.
Does cloudy weather affect solar charging?
Yes. Cloud cover reduces solar panel output, which means batteries recharge more slowly.
Can I leave Starlink plugged in all the time?
Yes. Many RV owners leave it connected continuously when they have sufficient battery capacity or shore power.
Can I use Starlink while driving?
Starlink offers solutions designed for in-motion use, but compatibility depends on your hardware and service plan. Always follow Starlink’s current guidelines.
What size inverter do I need?
A quality pure sine wave inverter with enough capacity for Starlink and your additional devices is recommended. The exact size depends on your total power requirements.
Can I use portable solar panels?
Absolutely. Portable panels are a great option because you can move them into direct sunlight while keeping your RV parked in the shade.
How many solar panels do I need?
The answer depends on your daily energy use. Many RV owners running Starlink choose 200–400 watts of solar capacity for comfortable off-grid camping.
Is Starlink worth it for RV travel?
If you frequently travel to remote areas, work from the road, or enjoy boondocking, Starlink can provide reliable internet where cellular service is unavailable.
Final Verdict
Starlink has transformed the way RV travelers stay connected. Whether you’re working remotely, streaming your favorite shows, or exploring remote public lands, a reliable internet connection opens up more travel possibilities.
If you camp mostly on weekends, a compact power station like the ALLPOWERS R600 may provide everything you need for Starlink and a few essential devices.
However, if you work remotely, travel full-time, or spend several days boondocking, a larger system such as the ALLPOWERS S2000 Pro offers greater battery capacity, longer runtime, and more flexibility.
No matter which setup you choose, the key to success is simple: understand your daily power needs before buying your equipment. Pair the right solar generator with quality solar panels and a dependable mounting solution like those from Winegard, and you’ll be ready to enjoy reliable off-grid internet almost anywhere your RV takes you.
🚐 Ready to Build Your Off-Grid Starlink Setup?
Explore our recommended equipment, compare the latest prices, and choose the setup that best fits your travel style. Investing in the right gear today can help you stay connected, travel farther, and enjoy greater freedom on every RV adventure.
Ready To Get Started
Melinda Keres, is the founder of RV Explorer Journey, a resource dedicated to helping RV travelers explore the open road with confidence. Through extensive research and a passion for the RV lifestyle, Melinda curates honest gear reviews, campsite guides, solar power tips, and money-saving travel advice to help both beginners and seasoned road trippers plan their perfect adventure.